Creating Panoramic Images - Continued
For creating
interior panoramas a specialized bracket that aligns the cameras
rotation to its “nodal” point (explained later on)
Panorama animated and published with StillMotion
PE
After you get
your exposures determined you will take overlapping images of the
interior, which will be “stitched” by your software to create the
panorama. Advantages of stitching over using super wide-angle
lenses are as follows:
- No fisheye distortion
- Higher resolution by combining images
- Does not require specialized software to show
The tricks to
good panoramic images are a leveled camera, properly positioned
camera on a tripod and sufficient overlap in the image segments.
Advanced Techniques
 |
|
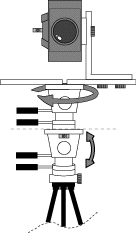
A Panoramic Rig |
It is also
important to have a tripod that will allow your camera to rotate
on the “Nodal Point”. The nodal point is the point inside your
camera where the light rays converge and flip over. When shooting
a panorama it’s necessary to rotate about this point to eliminate
the image mismatch caused by parallax error. This will become
more important if you are creating panoramas of small spaces with
short distances to the camera, here the “parallax” can be
noticeable. You can buy a “Rotator” head for panoramas for around
$200.00 or go to your local hardware store and make your own for
less than $10.00. You will need to experiment to find the nodal
point by pivoting the camera at different positions until you
find the best spot. (Try placing the pivot point at approximately
the spot where the lens is attached to the camera first) There is
more information concerning this at
http://www.edb.utexas.edu/teachnet/QTVR/NodalPoint.htm
Don’t let
this section scare you. You may get perfectly good results from
you existing camera tripod section when the camera is mounted in
the horizontal position.
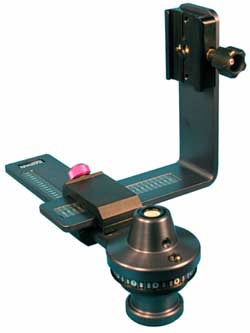 |
|
A typical commercial
panoramic head |
TIP:
When your are capturing an image, identify in your mind a feature
in it about one third from
the right side of the scene. Use this feature as the start
for you next image. You wont need any additional costly
hardware to manage the overlap. We recommend about a third
of the image in over lap for good repeatable results with most
stitching programs.
Digital
imaging is both art and science. The best way to learn it is to
do it. Creating your own panoramas whether for real-estate or
vacation scenes is worth the effort.
The next
article in this series will discuss how do build and display interactive tours that can contain panoramas and standard
format images.