Working with Menus and Actions
This tutorial describes how the Gallery Movie shown on the WD Product Page was created.
The screen shot below shows the Slide Sorter view of the images and menu elements that make up the Gallery movie.
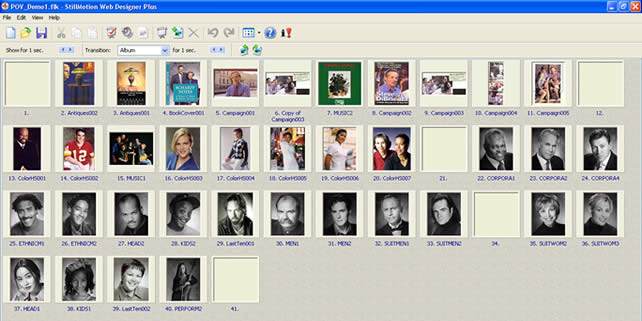
The five blank slides are the menus.
Go through the Gallery Movie and observe its behaviors (actions). Here are the main features included in the Gallery movie.
- Preloader show a title while a small portion of the show "pre-loads" this is only used if you are publishing to web.
- VCR controls for starting, stopping and advancing slides
- Menus for navigation
- Slide actions for returning to the menu
- Music, five sound tracks with automatic switching
- Title page for the preloader
Creating the Gallery Menu
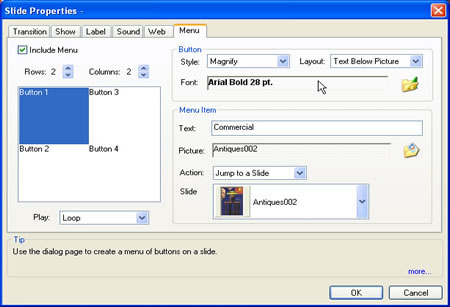
The image below shows the Menu tab with all the settings used in the Gallery Movie
- All the slides to be used where inserted into the Slide Sorter.
- They where then arranged by with Cut and Paste to be organized into categories (topics) for display.
- A Blank Slide was inserted at the beginning. This is to be the navigation menu. (any slide can be turned into a menu and this how different backgrounds can be applied to menus.)
- The inserted slide is double clicked and the Slide Properties tabs appear. The Menu tab is then selected. We then clicked on the Include Menu box to activate the Menu Tab.
- We decided we wanted four topics (chapters or topics) in the Gallery and that we wanted it to appear as two rows and two columns, we could have created a single row or a single column if that was what we wanted. We click on the Row and Column arrows and the Menu Window changes to represent the layout selected.
- We then created the display attributes of the menu; we decided to use image buttons with text under them. We picked the (Font) type face, size and color for the type faces and the image button effect (Style); here we picked Magnify from the Style menu.
- We then created the navigation by defining the buttons and their actions. Click on the Button number location in the Menu Layout Window. This determines the button that is being worked on.
- All the buttons in this example where created the same way, each button can be done differently to suite the navigation needs of the project. The Menu Item Panel contains controls for creating the buttons. First the title of the button is entered in the Text window, then image to be assigned to button is selected by browsing (Picture).
- The button action (what happens when you click on it) is then selected from the Action menu, we choose Jump to slide here.
- When Jump to a slide is selected the Slide Menu box will appear beneath the Action menu. A menu list is created showing a thumbnail and the name of each slide in the show. Click on the slide you want to jump to when the image is clicked on.
- This is repeated for each button location creating the navigation menu.
Creating the Navigation Structure
We now have created a navigation menu that will get us to the start of each topic in our show. When we play the show as it currently is built it will start at the slide selected and then play till the end of the show. Since we only want to view the images in a given topic we must add additional navigation.
The Slide Sorter image at the beginning of the tutorial shows one solution. We insert a menu at the end of each topic. We do not have to create a new menu we simply Copy the menu slide and Paste it after the last slide in each group.
Since we want to the show to stop playing when we get to a menu we need to add the appropriate action to the menu slide.
The Play panel in the lower left of the Menu tab selects the action for the Menu.
You can Pause, Loop or Continuing playing as a regular slide.
The selection is made based on the next consideration; adding music to the Gallery.
Before we talk about adding music we have one more consideration. We want to go to the menu anytime any slide is clicked on.
Since we want to do this for all slides there is a very easy way to do this.
- Select Slide Show Properties (remember we want to do this for all the slides)
- Select the Web Tab
- In the On Mouse Click Panel we select Jump to a slide
- We select any menu slide as the target of the action
The menu navigation is now completed.


