The Camera Window
The Camera Window
determines what the viewer will see in the movie. The aspect ratio
of the Camera Window (height / width) remains fixed for the entire
movie and determines the aspect ratio of the created movie.. The
aspect ratio can be changed under the Options menu by
selecting the Set Viewer Aspect Ratio option.

 Figure
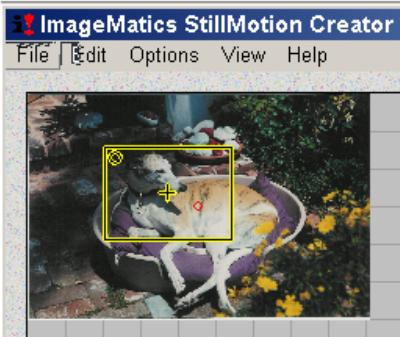
3. Camera Window Details
Figure
3. Camera Window Details
The Camera Window can be moved, resized and rotated
in three different ways. A small red circle appears in the exact
center of the image. This placed as a convenience for alignment
purposes. The Camera Window contains a cross hair cursor in the
center also for alignment reference. When the cursor is moved over
the center of the image it changes to a small “+”, again this is only
as a reference mark.
The first is interactively under mouse control.
When the mouse is moved over the Stage and outside the Camera Window
the cursor becomes a white arrow pointed to the upper left, when the
cursor is moved over the Camera Window it changes shape to a hand.
Holding down the left button and moving the cursor will cause the
Camera Window to follow it. The image in the Viewer will move along
with the Camera Cursor showing the current view.
The horizontal and vertical positions of the center of the Camera
Window are shown in the Status Window in the lower left hand corner
of the screen, immediately to the left of the Time Line. The width
and rotation angle are also shown here.
Moving the mouse over the edge of the Camera window causes it shape
to change to a diagonal line with arrowheads on each end. This is the
resize mode. Holding down the left mouse button causes the Camera
Window to either grow or shrink depending on the direction of
movement. Moving in toward the center of the Camera Window causes it
to shrink in size and moving it out cause it to grow.
Holding the Shift Key down before beginning to move the Camera Window
will lock the movement to either horizontal or vertical (which ever
direction the motion starts). The Shift Key must be held down while
the mouse is moved to maintain the straight-line path. This provides
exact control for horizontal and vertical pans where even a single
pixel of error is undesirable
Shortcut Keys For
Camera Window Control
A set of shortcut keys are provided
for doing common Camera Window moves such as Right and Left Justify,
Top and Bottom Justify, Center and two special key function that
either expands the camera to the width of the image or expands the
Window to the length of the image.
With these shortcut keys creating
panoramas or accurately repeatable motion sequences becomes very fast
and very easy.
Here are the Camera Window Shortcut
keys:
[Ctrl-left]
Align the camera to picture's left
[Ctrl-right]
Align the camera to picture's right
[Ctrl-home]
Align the camera to center of picture
[Ctrl-up]
Align the camera
to top of picture |
[Ctrl-down] Align the
camera to picture's bottom
[Ctrl-PgUp]
Expand the camera to picture's height
[Ctrl-PgDn]
Expand the camera to picture's width
|