|
Image Rotation, Perspective and Key Frame Dialog Box
Rotation of the Camera Window is controlled by
moving the cursor over the small circle located in the upper left
hand corner of the Camera Window, holding down the left mouse button
and moving the mouse to cause rotation. The cursor will change to a
small curved line with arrows on each end to indicate that the Camera
Window may be rotated. Accurate rotation is difficult using the
cursor method. It is recommended for accurate rotations and for
rotations of greater then 360 degrees that the second Camera Control
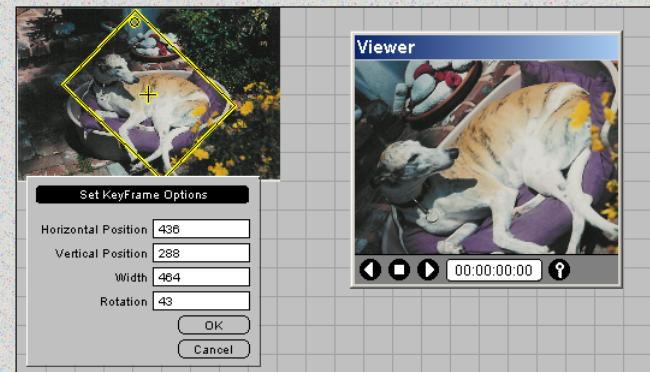
method be used. This is the Set Key Frame Options dialog box that
appears when the right mouse button is pressed while the cursor is
over the Camera Window. The section about Key frames will make the
title of the dialog box clear.
   Figure
4 Rotation Figure
4 Rotation
The second method for controlling the Camera Window
is by through the Set KeyFrames Options dialog box which is
brought up by right clicking anywhere in the Camera Window.
Figure 4 shows the KeyFrame Options Dialog Box.
The Horizontal Position (X) , Vertical Position (Y), and Width of the
Camera Window are shown here as pixel values. These values may be
changed by highlighting them with the mouse by holding the left key
down while moving over the field and then entering the desired
values.
The Rotation field controls the angle the Camera Window is to be
rotated to. 360 represents a complete rotation for more than a full
rotation use values larger than 360 for example setting the Rotation
to 720 will cause two ration between the Key Frames.
The third way to control the position of the Camera windows is to use
the Right and Left Arrow keys on the keyboard. Each depression of the
key causes the Camera Window to move a single pixel in the indicated
direction.
Creating Perspective Effects The Perspective tool is
used as an extension of the Camera Window control.
Rotation of the Camera Window is
controlled by moving the cursor over the small circle located in
the upper left hand corner of the Camera Window, holding down the
left mouse button and moving the mouse to cause rotation. The
cursor will change to a small curved line with arrows on each end
 to indicate that the Camera Window may be rotated. See the
Rotation Reference page. to indicate that the Camera Window may be rotated. See the
Rotation Reference page.
Once you have the rotate icon hold the Control key down and the
Perspective Cursor  will
appear. Now moving the cursor forward and backward will
change the shape of the square to a trapezoid representing
perspective. The short side of the trapezoid representing the
tilt of the perspective toward the image. will
appear. Now moving the cursor forward and backward will
change the shape of the square to a trapezoid representing
perspective. The short side of the trapezoid representing the
tilt of the perspective toward the image. .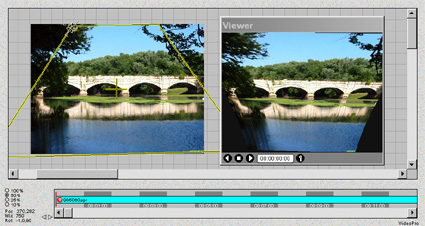
|