PurchaseMembership              

Products User Gallery Company Support Partners Resources
Examples

Examples (How To)

Basic Movie Continuous Loop
Creating Holds
Image Rotation
Multi Image
Fade Effects

Image Smoothing
Advanced Effects

 Applications

Web Development

Photography

Content Publishing
Video

::::::::::::::::::::::::::::::::::

Reference

Examples
Usage Tips
FAQs
Quick Start
Screen Functions

Menu Functions

Glossary


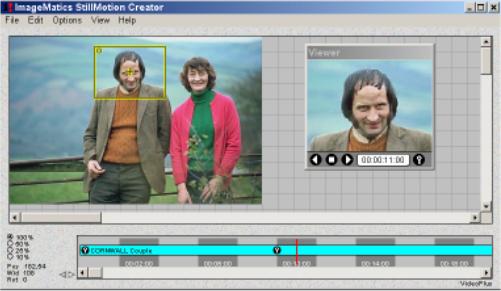
Example 2 How to Make a Continuous Loop Movie

In this example we will take the Movie made in Example 1 and edit using Cut and Paste of KeyFrame Markers to make a continuous loop.  The Image file (Cornwall Couple.tga), the Show File (example2.mpx) and the resulting Flash Movie (example2.swf) may be downloaded by clicking on the Download Icon.
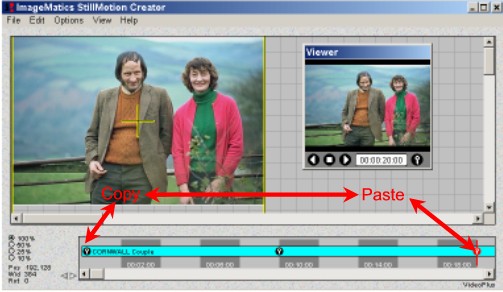
Concept A KeyFrame Marker is an object that contains all the information about a start or end point in a Movie segment.  Copying a KeyFrame Marker copies all the information about the size and orientation of the image in the Camera Window.  To make a continuously looping Movie that does not have abrupt jumps when it repeats (like the Movie in Example 1) the Image must end in the same position that it starts.  Copying the start KeyFrame Marker  to the end of the Movie accomplishes this.  Try it, it works.  We will start where we ended in Example 1.

Step 1 Here is the screen at the end of Example 1.  We will click on the first (leftmost) KeyFrame Marker and then Copy it.  This is done either by pressing CTL-C or selecting Copy from the Edit Menu.  Cut and Paste work the way it does in most MS software applications.


Step 2 The Timeline Indicator is moved to 20 seconds and a Paste operation is done.  A Paste may either be done by pressing CTL-V or selecting Paste from the Edit Menu (as in Copy in Step 1).  The Movie has now defined a zoom-in from the first to the second KeyFrame Markers and a zoom-out from the second to the third KeyFrame Markers.  Since the First and last KeyFrame Markers are the same the Image returns to its start position and a loop is completed.

Note:
The Camera Window and Viewer show the same view of the image as in Example 1 Step 2 which shows the screen after the first KeyFrame Marker has been set.


Figure 3 Example 2 SWF File created in this example shows a continuous loop.

Step 3 Preview the Movie using the Viewer Window's VCR-like controls.  You will see the Movie zoom-in and then zoom-out to its start.  Create the Flash Movie as in Example 1 by Selecting the Make Flash SWF Movie entry under the File Menu.  See Example 1 Step 4 for details.

Note:
To make the file continue to loop as shown on the adjacent figure the proper parameters must be set in the published source code that will go on your Web page.  See the Resource sections on Publishing SWF files for more information.


Example 3 will illustrate how to ad a Hold to a movie.


Copyright Net<X>Corporation, All Rights Reserved