PurchaseMembership              

Products User Gallery Company Support Partners Resources
Examples

Examples (How To)

Basic Movie Continuous Loop
Creating Holds
Image Rotation
Multi Image
Fade Effects

Image Smoothing
Advanced Effects

 Applications

Web Development

Photography

Content Publishing
Video

::::::::::::::::::::::::::::::::::

Reference

Examples
Usage Tips
FAQs
Quick Start
Screen Functions

Menu Functions

Glossary


Example 1 How to Make a Basic Movie

This example will show how a basic Flash Movie is created.  The Movie will be a simple pan and zoom from a wide angle shot to a close up of the man's face.  The files associated with this example may be downloaded by clicking on the download icon.  The files are contained in a self extracting .exe so simply click on the downloaded file and the test files and resulting SWF file will be loaded into your selected directory.  Click on the Download Icon to download the Example 1 files.

Step 1 From the File Menu the Load Image selection is picked.  The image file is then selected.  
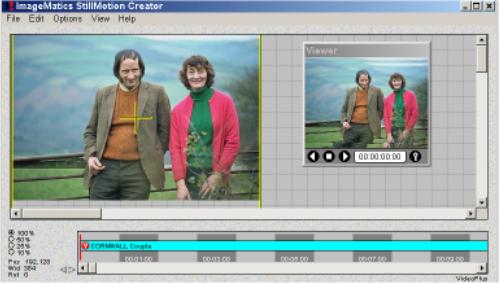
Here Cornwall Couple.tga is the selected file.

Figure 1 shows the ImageMatics StillMotion Creator™ screen after the image is loaded.

Note:
The Camera Window covers the entire Stage
The entire image is shown in the Viewer
• The Viewer Time Frame Indicator shows 00:00:00 (the start)
A KeyFrame is inserted at the start of the Timeline and the name of the image is shown on the line
• The Timeline indicator is positioned at the load point (00:00:00)
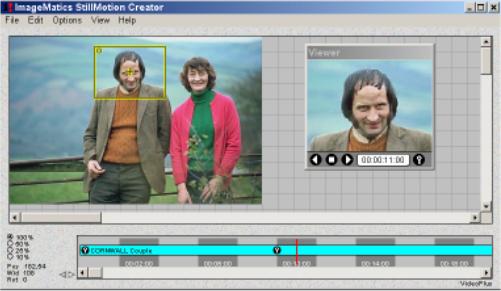

Step 2 The Camera Window is moved and sized to select the start image of the movie sequence to be created.  The KeyFrame Control button is clicked on the Viewer to lock the new Camera Window size and position.

Figure 2 shows ImageMatics StillMotion Creator™ screen after the start position is selected.

Note:
• The new position of the Camera Window
• The adjusted image shown in the Viewer indicating what the first frame of the motion sequence (move) will look like


Step3 The length of the move in time and the image view are selected by first moving the Timeline indicator bar to the 11 second mark.  The Time Frame Indicator will show 00:11:00 when exactly positioned.  The "+" and "-" keys will let you move the Indicator in single frame increments if you need to.  The Camera Window is moved and scaled to get the desired view and then the Key Frame Control is clicked to lock in the position and the time.  A new Key Marker appears on the Timeline.  Use the Viewer controls to preview your Movie. 

Figure 3 Shows the ImageMatics StillMotion Creator™ screen after end view and time are selected.

Note:
The image in the Viewer shows what  the end of the Movie sequence will look like
• A second KeyFrame Marker has been added at the Timeline
• The Timeline Indicator has moved one second after the KeyFrame Marker as a convenience.


Figure 4 Ex1.SWF as created in this example


Step 4 The final step is to create the Flash SWF file.  From the File Menu click on Make Flash SWF Movie.  Set the background color for white (all values 255) Leave the Frame rate at 30 and set the Quality to around 70%.  The movie shown here used 72%.  Click on OK and you will be prompted with a standard file menu to name and save your SWF file.  The Movie was saved under the name Example 1. Your done.

You can if you wish save the Show file which contains the timing and positions.  This lets you edit the Movie at a later time.  Select Save Show from the File Menu to do this.


In Example 2 we will Illustrate how to create a smooth continuous loop Movie and also how to Cut and Paste Key Markers


Copyright Net<X>Corporation, All Rights Reserved