Note: Visit the Using Website Page to get
the most out of this site.
Example 5 How to Make Movies With Multiple Images
In this example we will make a movie with multiple
images. This is a very simple task with The ImageMatics StillMotion
Creator™. We will add an image to the movie made at the
end of Example 1. We will then do a simple zoom in segment in the
movie. Finally we will make a continuous loop by going back to
the beginning of the first segment of the first image. The files
associated with this example may be downloaded by clicking on the
download icon. The files are contained in a self extracting exe so simply click on the
downloaded file and the test files and resulting SWF file will be loaded into
your selected directory. Click on the Download Icon to download
the Example 5 files.
Step
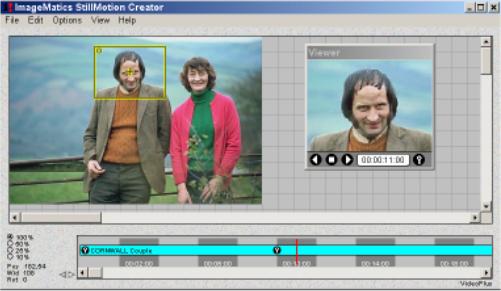
1 We begin by loading the Movie (MPX) file that was created and
saved in Example 1 Step 4. The Movie file is included in the
Example 5 Example download as Example5_1.mpx. Figure 1 shows
the the screen after the Movie file has been loaded.
• Note the the
Timeline
Indicator is at 11 seconds and not sitting on the
KeyFrame Marker.
The StillMotion Creator automatically advances the Time cursor one
second in anticipation of the next
Camera Window move. We must
move the time point back to the
Key Marker to set up the
desired position for the loading of the next Image.
Step
2 As addressed in the Note in Step 1 we first move the
Timeline
Indictor to the KeyFrame Marker of the end of the Movie segment.
From the File Menu the
Load Picture function is
selected. This presents a standard File Box that provides for
the selection of the next Image to load.
Figure 2 shows the screen immediately after the
image file Hawaiian .jpg has been selected and loaded.
Note:
• The filename of the new
image has been added to the Timeline and a new color is used for the
image
Step
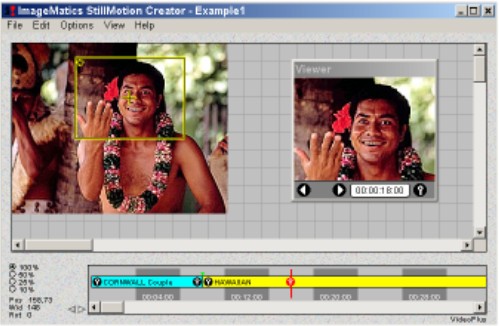
4 A zoom-in is created at 18 seconds. Play the Movie in the
Viewer and you will see the zoom-in on the man's face in the first
image. At the 10 second mark the new image will appear and the
movie will now do an 8 second zoom into the Hawaiian's face.
Step
5 Now we finish the multi-image loop. Using Load Image we
load another copy of the Couples picture at the end
KeyFrame Marker
shown in Step 4 above.
Figure 5 shows the
Copy and Pastes. First we
copy the end KeyFrame Marker from the first segment to the first
KeyFrame Marker in the final segment. This copies the
Camera
Window position as shown in Figure 5 to the start of the segment.
We then Copy the start
KeyFrame from the first segment, move the 8
seconds on the Timeline and then
Paste it. We have now complete
the loop.
Step 6
Create the Flash Movie as in
Example 1 by Selecting the
Make Flash SWF Movie entry under the File Menu. See
Example 1 Step 4 for details. Figure
6 is the exciting result. We Won't be winning any awards for
this one.
The hard break between the images
is not recommended style.
InExample 6 we will add
fades between the scene changes and demonstrate how to do a fade to
black.
Copyright Net<X> Corporation 2001, All rights reserved

 Step
1 We begin by loading the Movie (MPX) file that was created and
saved in
Step
1 We begin by loading the Movie (MPX) file that was created and
saved in 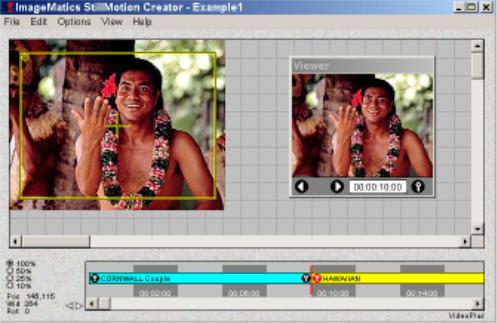 Step
2 As addressed in the Note in Step 1 we first move the
Step
2 As addressed in the Note in Step 1 we first move the
 Step
4 A zoom-in is created at 18 seconds. Play the Movie in the
Viewer and you will see the zoom-in on the man's face in the first
image. At the 10 second mark the new image will appear and the
movie will now do an 8 second zoom into the Hawaiian's face.
Step
4 A zoom-in is created at 18 seconds. Play the Movie in the
Viewer and you will see the zoom-in on the man's face in the first
image. At the 10 second mark the new image will appear and the
movie will now do an 8 second zoom into the Hawaiian's face.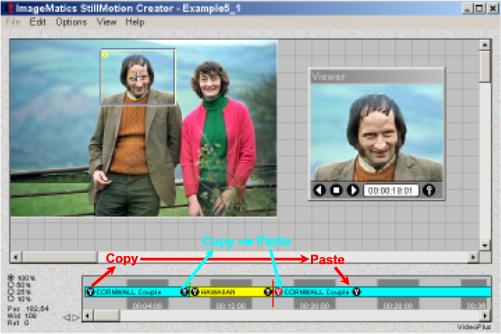 Step
5 Now we finish the multi-image loop. Using Load Image we
load another copy of the Couples picture at the end
Step
5 Now we finish the multi-image loop. Using Load Image we
load another copy of the Couples picture at the end